- Register
- Log in
-
Shopping cart
(0)
You have no items in your shopping cart.
Escort Elf Pump User Manual
813549 (L) Rev 10
Download as a PDF here
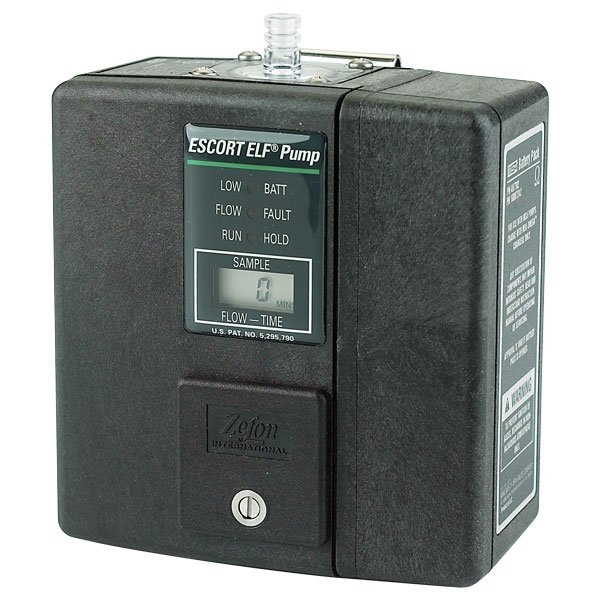
Shop Escort ELF here
Section 1: General Information
Introduction
The ESCORT ELF Pump introduces a totally new, patented concept of flow control and flow readout (U.S. Patent 5,295,790). The heart of this new system is the electronic laminar flow sensor. The ELF sensor combines a laminar flow element and a differential pressure sensor to measure sample volume flow rate. This measure of flow rate is not affected by changes in sample loading or the other factors that affect rotameter-type indicators used in other pumps. The ELF sensor provides an electronic signal which is linearly related to flow rate. This signal is used in the pump control circuit to maintain the chosen flow rate constant to within ±2.5% and is used in the readout circuit to allow the digital display of the actual flow rate to within ±0.1 liters per minute (LPM).
The ESCORT ELF sensor and control circuitry are very stable both in storage and use. Together they form a secondary standard to maintain the calibration accuracy for at least 200 hours of pump usage. A built-in operating time totalizer helps remind the user of the total operating hours since the last calibration check was performed against a primary flow standard. This totalizer automatically resets to 0 when a calibration is performed. If the pump is used in the coal mine dust sampling program, these calibration checks should be done after each 200 hours of use. If the pump is used for OSHA compliance sampling, the recalibration should be performed monthly.
Operating Specifications
Electrical Characteristics
- POWER SUPPLY: 4.8-volt battery pack of four NiMH cells Battery packs MFG before 10/2011 contain NiCd cells
- BATTERY PACK CAPACITY: 2.8 ampere hour (NiMH) Priorto 10/2011 may contain 2.4 or 1.8 ampere hour(NiCd)
- BATTERY PACK RECHARGE TIME: 16 hours (overnight) with recommended chargers
- CHARGING TEMPERATURE: 10o to 30oC (50o to 86oF)
- TYPICAL BATTERY PACK LIFE: 300 or more charging cycles
Operating and Physical Characteristics
- FLOW CONTROL: Volumetric flow rate is controlled at the set-point with automatic compensation for battery voltage, altitude, temperature, and sample load changes
- OPERATING RANGE: 0.5 TO 3.0 LPM & 5 to 30 inches water load up to 1.0 LPM; up to 30 inches of water load up to 2.0 LPM; up to 20 inches of water load up to 2.5 LPM; and up to 10 inches of water load up to 3.0 LPM
- FLOW BLOCKAGE DETECTION: When flow is blocked the FLOW FAULT LED: indicator lights and stays lighted until the cause of flow blockage is removed. If blocked for longer than 1.5 minutes, the pump shuts down. Pumps may be ordered that are not factory programmed to shut down upon blockage, however pumps configured this way are NOT suitable for coal mine dust sampling by mine operators.
- FLOW READOUT: Liquid crystal digital display with 0.01 LPM resolution from 0.5 to 3.0 LPM. Accuracy ±2.5% from 1.0 to 3.0 LPM, 0o to 45oC ±5% from 1.0 to 3.0 LPM, -20o to 0oC and 45o to 65oC ±5% from 0.5 to 0.9 LPM, 0o to 45oC
- ELAPSED TIME READOUT: Quartz controlled timer reads out to 999 minutes in 1-minute steps. Holds last reading after either flow fault or low battery shut-down, and when pump is OFF or in HOLD mode; resets to zero automatically when pump is turned ON. Timer does not count time when FLOW FAULT LED is lighted.
- SCHEDULED CALIBRATION: The pump has an operating hours totalizer to help remind user of the need for periodic calibration checks.
- OPERATING TIME: Varies with flow rate, sampling device loading and temperature. Minimum twelve-hour operation at 2.5 LPM with 20-inch water load and with new fully charged battery. (See FIGURE 3-1.)
- LOW BATTERY FUNCTION: The pump shuts down and lights the
- LOW BATT LED: when battery voltage drops below 4.1 volts
- TEMPERATURE COMPENSATION: 0o to 45oC (32o to 113oF) ±2.5% accuracy -20o to 0oC and 45o to 65oC (-4o to +149oF and 112o to 148oF) ±5.0% accuracy
- ALTITUDE COMPENSATION: Below sea-level to at least 10,000 ft.
- DIMENSIONS: 2-1/4 inches deep x 4-1/4 inches high x 4 inches wide (5.7 centimeters deep x 10.8 centimeters high x 10.2 centimeters wide). Dimensions include switch cover but exclude hose barb and belt clip.
- WEIGHT: 23 oz. (652 grams)
- CASE: Case plastic is electrically conductive to reduce radio frequency interference; an optional leather case is available for pump protection during rough usage such as underground mining or construction and demolition work areas
- SERIAL NUMBER IDENTIFICATION: Located on the side of the case under the battery pack (include number in correspondence with Zefon)
Section 2: Theory of Operation
Introduction
This section describes the operation of the sample flow control and readout circuitry of the ESCORT ELF Pump.
Functional Description of Operation
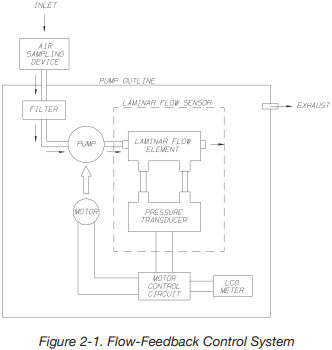
The ESCORT ELF Pump contains a rechargeable battery pack, a motor-driven pump, the ELF sensor, and the electronic circuit to control and display the flow rate.
The battery pack consists of four rechargeable cells. The cells are connected in series with a current limiting resistor to allow use in hazardous atmospheres (see “Warnings”). The pack also has a PTC resistor which functions as a self-resetting circuit breaker to prevent damage to the pack if the output terminals are accidentally shorted. A thermal cutoff protects against damage from high temperature conditions in the NiMH battery pack.
The motor-driven pump consists of an inlet pulsation dampener, a diaphragm pump, and silicone rubber inlet and exhaust valves. The diaphragm is driven by the motor to make one pump stroke with each revolution. The pulsation dampener acts as an elastic storage chamber to smooth the individual pump pulses to minimize their effect on the sampling devices connected to the pump inlet.
The ELF sensor consists of a laminar flow element and a pressure sensor. All of the air flow through the pump passes from the exhaust port of the pump and through the laminar flow element. The element is a hollow cylinder of porous stainless steel. The air flowing through the narrow passages in the cylinder produces an air pressure difference between the outer and inner walls of the cylinder. This difference is monitored by connections to the high and low pressure taps of a sensitive differential pressure sensor. The electrical signal from the sensor is a linear voltage, which is directly related to the air flow through the laminar element. This signal is compared to the flow set point in the electronic circuit and is used to control the flow at the set point. Any deviation in flow rate is sensed and the motor power is adjusted to maintain the preset flow rate. In the case of a blocked flow or operation beyond the pump capacity where the flow cannot be brought to within ±0.1 LPM of the set point, the flow fault LED will be lighted.
 LED Indicator Operation
- The RUN/HOLD LED assures the user that the unit is operating, even in poorly lit, noisy environments.
- The RUN/HOLD LED also indicates the HOLD function. If the pump is switched to HOLD, the pump shuts down, the timer stops, and the LED is switched to a blinking mode. When the RUN/HOLD switch is pressed again, the pump will restart and the timer will continue from its “hold” value.
- The LOW BATT LED indicates operation of the low battery detection circuit. When the battery pack drops to 4.1 volts, the circuit causes the pump to shut down, the timer to stop, and the LOW BATT LED to light. This limits further battery drain to just a few milliamperes, which, in turn, helps prevent deep discharging and battery pack damage upon recharging. It also helps prevent the invalidation of the sample being taken, because the timer stores the actual sample time and the flow rate is controlled up to the time of shut-down.
- The FLOW FAULT LED indicates operation of the flow blockage detection circuit. If the sample inlet (or the sampling device connected to the pump) is blocked, the FLOW FAULT LED lights until the cause of the flow fault is removed.
- The pump is normally factory-programmed so that a fault longer than 1.5 minutes will shut down the pump. The pump may be restarted from a flow fault shutdown by pressing the RUN/ HOLD switch. Restarting in this manner allows continuation of the sample period without having the timer reset to zero.
- The Flow Fault LED is lighted whenever the pump flow rate is more than ±0.1 LPM different from the set- point. It is normal for it to be lighted briefly while the pump is started or when a new set-point is selected.
Section 3: Operation
Charging the Battery Pack
Use any Zefon/MSA OmegaTM charger (for example: P/N 494716, 495965 or 801759) for charging the battery pack. Remove the protective rubber plug and charge the battery pack for 16 hours. (Note that charging for longer periods will not reduce battery life, provided the charging is performed at room temperature.) The battery pack can be charged with the pack removed from the pump. Always replace the rubber plug after charging and before using the pump to prevent water entry into the jack.
![]()
Do not charge the battery pack in areas that may contain a flammable mixture of combustible gases, vapors, or dust and air; otherwise, an explosion may occur because a source of ignition exists during charging.
![]()
Use only a Zefon/MSA Omega™ (Ω) charger from Zefon/MSA to charge the pump.
Operating Time
The maximum expected operating time for a pump with a fully charged battery pack depends on:
1. The selected flow rate.
2. The vacuum load imposed by the sampling device.
3. The temperature.
4. The age of the battery pack.
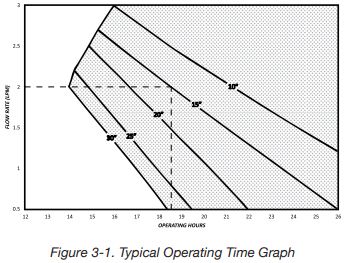
See FIGURE 3-1 for approximate operating times. The shaded area shows operating loads and flow rates within the pump specifications. The example shown with dashed lines is for a pump set for 2.0 LPM with a sampling load of 15”; the expected maximum operating time would be 18.5 hours. This figure is based on room temperature operation with a new pack. At 0 degrees Centigrade, the operating time will be reduced by 10%, 20% at -20o C. After several hundred charge/discharge cycles, the pack capacity may be reduced by 20%.
Personal/Area Sampling
The ESCORT ELF Pump is designed for either personal or area sampling of ambient air. It automatically provides a constant volumetric flow rate of the sample air through the sampling device (filter disc, impinger, or absorbent tube) to measure the concentration of airborne mists, dusts, particulates, gases, and vapors in the workplace.
Operating the Pump
1. Charge the battery pack for 16 hours using the Zefon/MSA Omega™ (Ω) Charger.
• Read the WARNING on the battery pack.
2. Connect the desired sampling device to the inlet fitting.
3. Press ON/OFF button until the RUN/HOLD LED lights.
• The Flow Fault and Low Bat LEDs will then light. During the time these LEDs are lighting, a number from 0 to 999 will be displayed. This is the total of the pump’s operating hours since its last calibration.
• When all three LEDs are lighted, the display changes to 8.88 LPM/MINS, to show all segments are functional.
• The pump will then begin operation. The LOW BAT LED will be dark if the battery voltage is above 4.1 volts. The Flow Fault LED will be dark when the flow rate is within 0.1 LPM of the setpoint.
4. Use the up arrow and down arrow switch buttons to adjust the flow setpoint if a new flow rate is desired. When either button is pressed:
• RUN/HOLD LED will be dark
• Display will show the flow setpoint being stepped up or stepped down to the new setpoint.
5. The RUN/HOLD button may be pressed to interrupt sampling without causing the timer to reset to zero.
6. Press the ON/OFF button at the end of sampling.
• Total sample minutes will be on the display and will remain until the pump is turned ON again.
7. Check calibration monthly (every 200 hours of use for coal mine dust sampling).
8. Operate the pump with a sampling device connected to the inlet. Operation without a sampler attached will reduce the life of the pump inlet filter. Operation at very low flow rates may be unstable without an attached sampling device, such as a charcoal tube.
Section 4: Routine Maintenance
Periodic Maintenance
Checking the Inlet Filter
The pump inlet contains dust and water filters to protect the pump from particles and water in the sample air (FIGURE 4-1). If the filters become clogged, the sample flow may be blocked or an extra load placed on the pump; therefore, check the filters regularly.
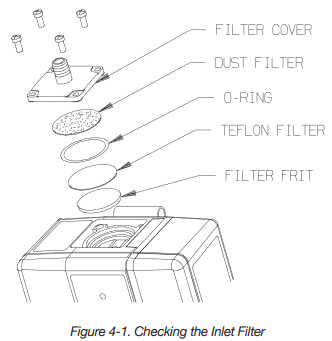
The frequency of the checks should depend on the amount of pump usage and the concentration of particles allowed to enter the pump. Usually, only the dust filter needs to be replaced. The Teflon* water filter should rarely need to be replaced. The water filter is very fragile and must be handled with care. Even a tiny pin hole will destroy its function. The filter frit should never need to be replaced if the other filters are maintained.
Filter Replacement
1. Remove the four screws holding the filter cover and O-ring.
2. Replace the filter with a new one.
3. Re-assemble the O-ring and cover.
Frit Replacement
1. Stab the frit center with a small screwdriver, and lift it out.
2. Press in a new frit.
3. Re-assemble the Teflon and dust filters, O-ring, and cover.
Battery Pack Maintenance
The NiMH battery pack is expected to have a service life of 300 or more charging cycles. Actual battery pack life will vary depending on the conditions of use and storage. High temperatures can cause accelerated aging. As the battery goes through charge/discharge cycles and ages, its capacity will diminish over time. If you experience run times that are noticeably shorter even with a fully charged battery, it has reached its end of life and should be replaced.
All batteries will self-discharge by themselves over time, even when not in use. Allowing batteries to fully discharge and remain fully discharged may damage the battery pack. To maintain the battery pack in top working condition, it is recommended that it be fully charged at least once every 30 days even if not used.
Battery Pack Replacement
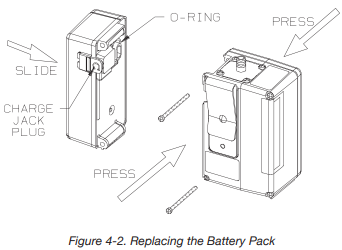
(FIGURE 4-2 illustrates the battery pack.)
1. Remove the two screws securing the battery pack to the case.
2. Separate the pack from the case.
3. Make sure that the O-ring is in place on the replacement pack. Then, slide the pack into the pump case while pressing the case front and back to make sure the case edges go inside the edges of the pack.
4. Insert the two screws and tighten.
Section 5: ELF Sensor Calibration
1. Check pump inlet filter for dust; replace if heavily loaded.
2. Turn ON the pump and allow it to reach its flow rate setting.
3. If the pump is not set for 2.50 LPM, set it to 2.50.
4. Allow the pump to operate for 10 to 15 minutes at 2.50 LPM. To check for leaks, temporarily block the pump inlet; 0.02 LPM or less should be displayed. If not, check the inlet filter cover and o-ring for correct assembly.
5. Leave the pump set for 2.50 LPM and turn OFF the pump.
6. Connect a primary calibration standard to the pump.
7. Turn ON the pump; as the pump goes through its self-check sequence, press and hold the ON/OFF and RUN/HOLD switches simultaneously until the display reads CAL. Immediately release both buttons. NOTE: Failure to release both buttons will turn OFF the pump.
• The display will show CAL and a countdown sequence of numbers from 9 through 0; thereafter, it will alternately display CAL and 2.50 LPM.
8. Operate the calibration standard and obtain at least six readings which are very close to one another.
9. Use the up arrow and down arrow switch buttons to step the pump display up or down until it agrees exactly with the average of the six readings.
10. Turn OFF the pump; the ELF sensor is now calibrated. Repeat monthly or every 200 hours of use.
11. When you next turn ON the pump, the operating hours will be reset to 0 and be displayed during the lighting of the FLOW FAULT and LOW BAT LEDs.
The Bios DryCal or Bios Defender should be used to calibrate or check the flow rate of a Zefon Escort ELF pump only if an isolating flow restrictor (e.g., a filter or an orifice such as P/N 632646) providing at least 10” WC is placed in line between the pump and the calibrator. Failure to use such an isolation technique can cause a calibration inaccuracy on the order of 2% and is not recommended.
Section 6: ELF Sensor Calibration for Pumps Used in the U.S. Government Mine Safety and Health Administration (MSHA) Coal Mine Dust Sampling Program
1. Check pump inlet filter for dust; replace if heavily loaded.
2. Turn ON the pump and allow it to reach its flow rate setting.
3. If the pump is not set for 2.00 LPM, set it to 2.00.
4. Allow the pump to operate for 10 to 15 minutes at 2.00 LPM. To check for leaks, temporarily block the pump inlet; 0.02 LPM or less should be displayed. If not, check the inlet filter cover and o-ring for correct assembly.
5. Leave the pump set for 2.00 LPM and turn OFF the pump.
6. Connect a primary calibration standard to the pump.
7. Turn ON the pump; as the pump goes through its self-check sequence, press and hold the ON/OFF and RUN/HOLD switches simultaneously until the display reads CAL. Immediately release both buttons. NOTE: Failure to release both buttons will turn OFF the pump.
• The display will show CAL and a countdown sequence of numbers from 9 through 0; thereafter, it will alternately display CAL and 2.00 LPM.
8. Operate the calibration standard and obtain at least six readings which are very close to one another.
9. Use the up arrow and down arrow switch buttons to step the pump display up or down until it agrees exactly with the average of the six readings.
10. Turn OFF the pump; the ELF sensor is now calibrated. Repeat every 200 hours of use.
11. When you next turn ON the pump, the operating hours will be reset to 0 and will be displayed during the lighting of the FLOW FAULT and LOW BAT LEDs.
Section 7: Repairs and Replacement Parts
Troubleshooting
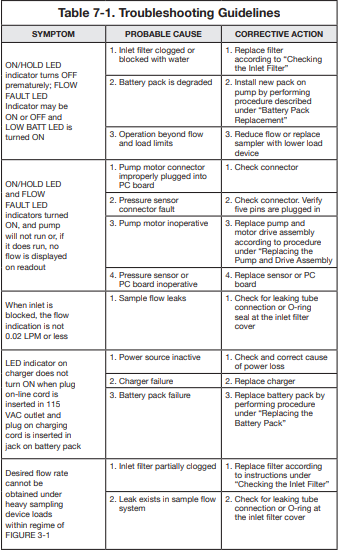
TABLE 7-1, “Troubleshooting Guidelines”, lists the symptoms of the most common problems; it also lists their probable cause(s) and the action required to correct each problem. Use the guidelines if you cannot calibrate the ESCORT ELF Pump or if the pump does not operate properly. If you cannot resolve a problem by using the guidelines, call 1-800-282-0073 to locate a local Zefon Repair Center.
![]() Use only genuine Zefon replacement parts when performing the maintenance procedures described in this manual. Failure to do so may seriously impair instrument performance. Repair or alteration beyond the scope of these maintenance instructions or by anyone other than a Zefon-trained service person could cause the product to fail to perform as designed, and persons who rely on this product for their safety could sustain severe personal injury or death.
Use only genuine Zefon replacement parts when performing the maintenance procedures described in this manual. Failure to do so may seriously impair instrument performance. Repair or alteration beyond the scope of these maintenance instructions or by anyone other than a Zefon-trained service person could cause the product to fail to perform as designed, and persons who rely on this product for their safety could sustain severe personal injury or death.
Sécurité Intrinséque
Avertissement: La Substitution de Composants Peut
Compromettre La Sécurité Intrinséque
Corrective Maintenance
When an inoperative part is located by using TABLE 7-1, Troubleshooting Guidelines, replace it according to one of the replacement procedures later in this section. Also, refer to “Obtaining Replacement Parts” later in this section for information on how to order the necessary part from Zefon.
Unplugging the Electrical Connectors
Service procedures which require opening the ELF pump case require the unplugging of two electrical connectors:
1. Pull on the motor electrical connector to remove the motor wires from the printed circuit board.
2. Pull on the 5-pin ribbon cable to remove the connector from the ELF sensor.
Reattaching the Electrical Connectors
1. When reattaching the motor connector, make sure the angular ramp at the end faces towards the latch projecting from the printed circuit board socket.
NOTE: The pump will operate with the connector installed the other way, but the above method is encouraged because the ramp and latch help keep the connector attached as the pump is knocked around during use.
2. When reattaching the connector to the ELF sensor, make sure pins #1 through #5 are straight and in line.
NOTE: If these pins are bent, use needle-nose pliers to straighten and align them. Pin #6 is intentionally cut off because it is not used in the ELF pump.
3. Pull the cable so that the end of the connector is about 7/8” above the printed circuit board.
4. Hold the pump face in the right hand and position your thumb and forefinger around the top left hand corner of the pump face.
5. Hold the connector with these two fingers and hold the pump case with the left hand.
6. Position the connector so that an end pin is just inside the funnel opening of the corresponding pin socket.
7. Gradually tilt the connector to get the next pin just inside its socket, and repeat this process until all five pins are just inside their corresponding sockets.
8. Slowly press the connector onto the pins until they “bottom out.”
9. Inspect the connector at the top and bottom to make sure all pins are correctly inserted.
Pump & Drive Assembly, Outlet Dampener, or Pressure Sensor Replacement
1. Remove two screws securing the battery pack to the case.
2. Remove the battery pack.
3. Remove the two screws securing the pump case.
4. Pull the 5-pin ribbon connector from the pressure sensor.
5. Pull the motor electrical connector from the PC board.
6. Remove the two screws securing the pump mounting collar to the back of the case.
7. Lift out the pump and drive while removing the inlet dampener connection from the fitting.
NOTE: A drop of soap solution (SNOOP*) “worked in” at the end of the rubber tube makes removal easier and will prevent tearing the rubber tube.
8. Remove the two screws securing the pressure sensor.
9. Remove the pressure sensor and be careful not to drop it, even to the table top.
10. Remove the outlet dampener if it is to be replaced.
11. Install the replacement pump and drive, outlet dampener or pressure sensor by reversing this procedure.
NOTE: Wetting the end of the outlet dampener will make sliding it over the sensor body easier. Make sure both cuffs are completely in the grooves.
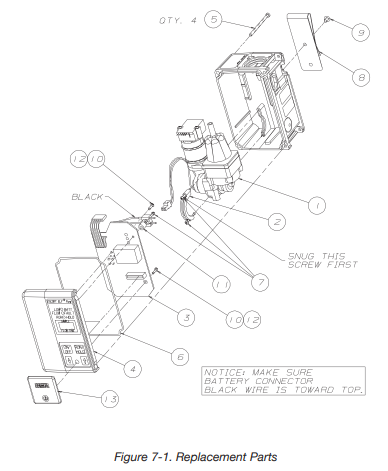
NOTE: Tighten the upper motor collar screw before tightening the lower screw when installing the new pump and drive.
Printed Circuit Control Board Replacement
1. Remove the two screws securing the battery pack.
2. Remove the battery pack.
*SNOOP is a trademark of Swagelok Company
3. Remove the two screws securing the pump case.
4. Pull the connector from the pressure sensor.
5. Pull the motor electrical connector from the printed circuit board.
6. Remove and save the three screws, two washers and spacer securing the PC board to the pump face.
7. Install the replacement printed circuit board by reversing this procedure.
NOTE: Be sure the battery connector is mounted with the black wire towards the top of the case.
Obtaining Replacement Parts
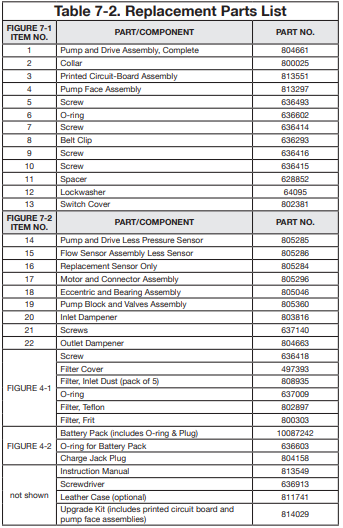
The ESCORT ELF Pump parts and part numbers are listed in TABLE 7-2. To obtain parts, service, or information in the U.S., call Zefon International at 1-800-282-0073. To reach Zefon outside the U. S., call +1 (352) 854-8080.
.png)
.png) Section 8: Warranty
Section 8: Warranty
Zefon Escort Pump Warranty
Zefon International warrants that, the Escort ELF personal sampling pump manufatured by and sold by Zefon International or authorized distributors of Zefon International shall be free from all defects in workmanship and materials under normal use and service within the warranty time period.
The warranty time period shall be for two (2) years from the date of original invoice from Zefon. Zefon International will repair or replace, at its sole option, any Escort ELF that is found to be defective by Zefon International. This warranty does not cover normal replacement parts such as inlet filters that are expected to be changed by the user under normal routine maintenance. The warranty shall be void and Zefon released from all obligations if there is damage from misuse, accident, abuse, improper operation and maintenance, or there is evidence the pump has been modified, altered or repaired by someone other than Zefon or Zefon authorized repair personnel.
This warranty constitutes the only warranty made by Zefon International concerning the Escort ELF and is in lieu of any other warranties, expressed or implied, including any warranties of merchantability or fitness for use of a particular purpose. Under no circumstance shall Zefon International be held liable to the buyer or any user for any punitive, incidental, consquential, special, or indirect damages.
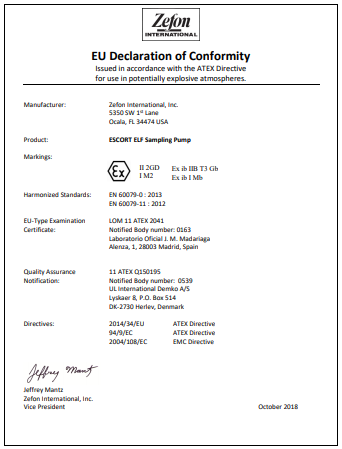
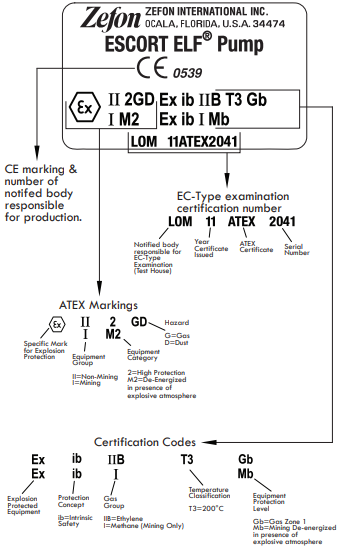
Section 9 ATEX Declaration and Markings
![]()
THIS MANUAL MUST BE CAREFULLY READ BY ALL INDIVIDUALS WHO HAVE OR WILL HAVE THE RESPONSIBILITY FOR USING OR SERVICING THE PRODUCT. Like any piece of complex equipment, this product will perform as designed only if it is used and serviced in accordance with the manufacturer’s instructions. OTHERWISE, IT COULD FAIL TO PERFORM AS DESIGNED AND PERSONS WHO RELY ON THIS PRODUCT FOR THEIR SAFETY COULD SUSTAIN SEVERE PERSONAL INJURY OR DEATH.
The warranties made by Zefon International Inc. with respect to the product are voided if the product is not used and serviced in accordance with the instructions in this manual. Please protect yourself and others by following them. We encourage our customers to write or call regarding this equipment prior to use or for any additional information relative to use or repairs.
In the U.S., contact Zefon at 1-800-282-0073.
To contact Zefon outside the U.S., dial +1 (352) 854-8080
or email at [email protected].
© Zefon International, Inc. 2018 - All Rights Reserved
1. Do not charge the battery pack in areas that may contain a flammable mixture of combustible gases, vapors, or dust and air; otherwise, an explosion may occur because a source of ignition exists during charging.
2. Do not operate the pump in oxygen-enriched atmospheres (more than 21% oxygen) containing combustible gases, vapors, or other materials. Fire or explosion can result from operating in these atmospheres.
3. Operate the pump with Zefon/MSA P/N 497702 or 10087242 battery pack only. Do not use other batteries or power sources.
4. When using the pump in a hazardous area (with respect to fire or explosion) as specified in the National Electric Code (NEC) Article 500 - Hazardous (Classified) Locations, the pump must be labeled stating that it meets the design criteria of the specific Class, Division and Group. Users must operate the pump in accordance with the instructions for that Class, Division, and Group. A copy of the NEC Code can be obtained from the National Fire Protection Association, Batterymarch Park, Quincy, MA 02269.
5. Use only genuine Zefon replacement parts when performing maintenance procedures described in this manual; failure to do so may seriously impair the ESCORT ELF Pump performance. Repair or alteration beyond the scope of these maintenance instructions or by anyone other than authorized Zefon service personnel could cause the product to fail to perform as designed, and persons who rely on this product for their safety could sustain severe personal injury or death.
![]()
1. Do not use the pump with organic fluids in an impinger without an absorber trap; otherwise, the pump will be damaged.
2. Use only a Zefon or MSA Omega™ (Ω) Charger to charge the pump.
3. If, after thoroughly reading this manual, you are uncertain of the installation, operation, or maintenance procedures, call 1-800-282-0073 for assistance.


